Experiment
6A: The Photoelectric Effect
BACKGROUND:
You will measure Planck's constant, and in the process
verify the quantum theory of radiation.
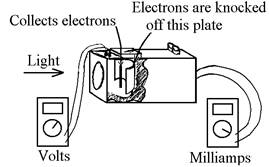
The apparatus contains a vacuum tube with a metal plate
in it. Light falling on this plate
knocks electrons off it, which travel through space and land on another piece
of metal. The electrons then flow from
the tube, through a circuit, and back into the tube to the plate where they
started. The tiny current in the circuit
is amplified then measured by a meter.
For several different wavelengths of light, you will
determine the maximum kinetic energy the electrons get from the light, KEmax.
This is done by seeing how much voltage is needed to turn them back
before they reach the other electrode, stopping the photocurrent. (For example,
if this "stopping potential" is 2 V, then KEmax
is 2 eV.) According to Einstein, KEmax = hf - f. Since this is a linear equation, you should
get a straight line if you plot KEmax as a
function of frequency. From the slope
and intercept of the line, you can get Planck's constant and the work function
of the metal. The fact that the stopping
potential depends on the light's wavelength, rather than its intensity,
contradicts classical theory, but is a natural consequence of Einstein's
concept that light is made up of photons.
To get the different wavelengths, you will use glowing
helium, glowing mercury vapor and a He-Ne laser. The He and Hg sources emit only certain
special wavelengths; the "lines" in its spectrum. To get a specific wavelength, you then remove
other lines by passing the light through a filter. The wavelength for each source and filter are
listed on the answer sheet. (In many
cases, more than one spectral line actually gets through the filter. The shortest wavelength present is
listed.) The laser is monochromatic, but
a filter helps eliminate background light.
CAUTIONS: 1. Don’t touch the metal ends of the helium tube when
it’s on; they’re at 5000 volts. Turn it
off when not in use. Also, the tube can
get hot.
2. The mercury
lamp gives off ultraviolet radiation which is bad for your eyes. Lay a sheet of paper over the space between
the lamp and the apparatus so you can’t look directly at the bulb.
3. The laser is
intense enough to damage your eyes if it shines directly in.
EXPERIMENTAL PROCEDURE:
The basic idea is to slowly turn down the voltage from
above the stopping potential, and watch for where a current first appears.
1. Plug in the
photoelectric apparatus and turn it on before anything else, so the amplifier
can start to stabilize. Also, turn on
the computer and start it booting up.
2. Connect a
digital multimeter, set to read DC volts to the
nearest .01 V, to the voltage plugs on the apparatus. Connect another digital multimeter,
set to read DC milliamps to the nearest .001 mA to the wires sticking out of
the case. (The ammeter built into the
case will read the same thing, but not as accurately.)
3. Select one of the light source/ filter combinations
shown on the answer sheet. (Always have
a filter on the photoelectric apparatus or you will be working with a mixture
of frequencies instead of just one.) The
long glass tube on a stand is the Helium source; the square gray thing with a
round opening is the mercury lamp, and you know what the laser looks like. Use books or blocks of wood to get the light
source and photoelectric apparatus to matching heights. Darken the room to eliminate other light
sources.
- When using helium, aim
the apparatus at the thin center part of the tube.
- Remember the sheet of
paper with the mercury lamp.
- Lay the laser on its side
on top of something about an inch and a half thick. The current seems to be largest when the beam
enters the apparatus a little above center.
4. Turn the
voltage knob (which controls the potential trying to turn back the electrons)
all the way up, so you know you're above the stopping potential. Adjust the "zero adjust" knob so
that the ammeter reads zero. It will
probably wander by a few thousandths of a mA; you’ll have to live with that.
5. Turn the
voltage down to zero and adjust the distance from light source to apparatus to
obtain a current of 5.0 mA. (One setup
won’t go that high. Use 1.5 mA with that
one.) With the laser, distance isn’t
much of a factor; it’s where the beam hits the tube. Play with it a little until you have around 5
mA. You may not be able to get 5
exactly. If it gives you too much
trouble, passing the beam through a f = 5 cm lens placed two or three feet from
the apparatus will spread the beam out, making the adjustment easier.
6. To observe
what the stopping potential is: Turn the
voltage knob up, stopping the photocurrent, then slowly turn it down, watching
for the first sign of current flowing. The
photocurrent starts out very small, so it can be hard to spot exactly where it
starts because it’s masked by other effects.
The ammeter can fluctuate a little at random, and also background light can
make a small, gradually increasing current as you turn down the voltage. If the photocurrent is real, inserting a
sheet of paper between the light source and the apparatus will make the current
decrease. Double check. (Don't peek at the voltmeter, or you'll just
go back to the same voltage you had the first time, right or wrong. Keep your eye on the ammeter until you decide
you see that first little bit of current.)
Don’t re-re-check now, it takes too much time. Try all the wavelengths, get the graph on the
computer and look for points that don’t line up with the others. Then try again if any seem suspicious.
7. When you
repeat with the other wavelengths, start each time by checking the zero and
then readjusting the light to apparatus distance so that the current with V = 0
is 5.0 mA.
ANALYSIS:
1. From each
wavelength, find the light's frequency.
2. From the
potential needed to stop them, what is the maximum kinetic energy of the
photoelectrons in each trial? For convenience, you may leave this in
electron-volts.
3. Have Excel
plot maximum photoelectron energy, KEmax,
as a function of the light's frequency, and calculate the best-fit slope &
intercept:
a. Open Excel. Type the x values in column A and the y
values in column B. The format for
scientific notation is, for example, 3.6e17 for 3.6 x 10¹⁷. 3.6*10^17 will
not work.
b. Draw a box around the numbers you want graphed. (If headings are in row 1, this would be columns A and B, rows 2 through 6.) Click Insert then Scatter then the option where nothing connects the dots.
c. On the Design tab under Chart Tools is a section called
Chart Layouts. (If you don’t see Chart Tools, click on the graph to make it
appear.) In Chart Layouts, click ![]() at bottom right to expand the choices and pick
layout 9. (The layout number appears
after a moment when you leave the curser on it.)
at bottom right to expand the choices and pick
layout 9. (The layout number appears
after a moment when you leave the curser on it.)
d. The axes should be labeled, including units. Click on the titles by the axes and type these in. Hit Enter.
e.
The equation of the best fit line should have appeared on the graph, but the
default settings don’t give enough significant digits. Right click on the equation, click Format Trendline Label, then under Category choose
Scientific. Click Close.
4. If you have any points
which are far off of the average line, go back to the apparatus and recheck
them. Once everything is good, print a copy to include in your report.
5. From the slope
and intercept of your graph, record Plank's constant and the work function of
the metal. Due to the difficulty in
deciding exactly when current begins to flow and also due to the small number
of data points, the uncertainty in the slope is fairly large. Call it
approximately + 25%.
6. In your
conclusion, compare your value for h to the accepted one.
Also, comment on the fact that there's a clear
relationship between stopping potential and frequency, a fact which cannot be
explained by classical physics.
PHY 133 Experiment
6A: The Photoelectric Effect
|
|
λ (nm) |
f (Hz) |
stopping
pot. (V) |
KEmax (eV) |
|
Laser,
red filter |
633 |
|
|
|
|
Helium,
yellow |
588 |
|
|
|
|
Helium,
blue |
447 |
|
|
|
|
Mercury,
blue |
436 |
|
|
|
|
Mercury,
green |
546 |
|
|
|
h
= ___________ +
___________
f =
___________